
Air conditioners and walk-in coolers do not create cold. They remove heat from an area where you do not want it and dump it somewhere where it does not matter.
To move that heat, the system circulates refrigerant through a closed loop of copper tubing. By changing the pressure of the refrigerant, the system forces it to boil at cold temperatures to absorb heat indoors, and condense at hot temperatures to dump heat outdoors.
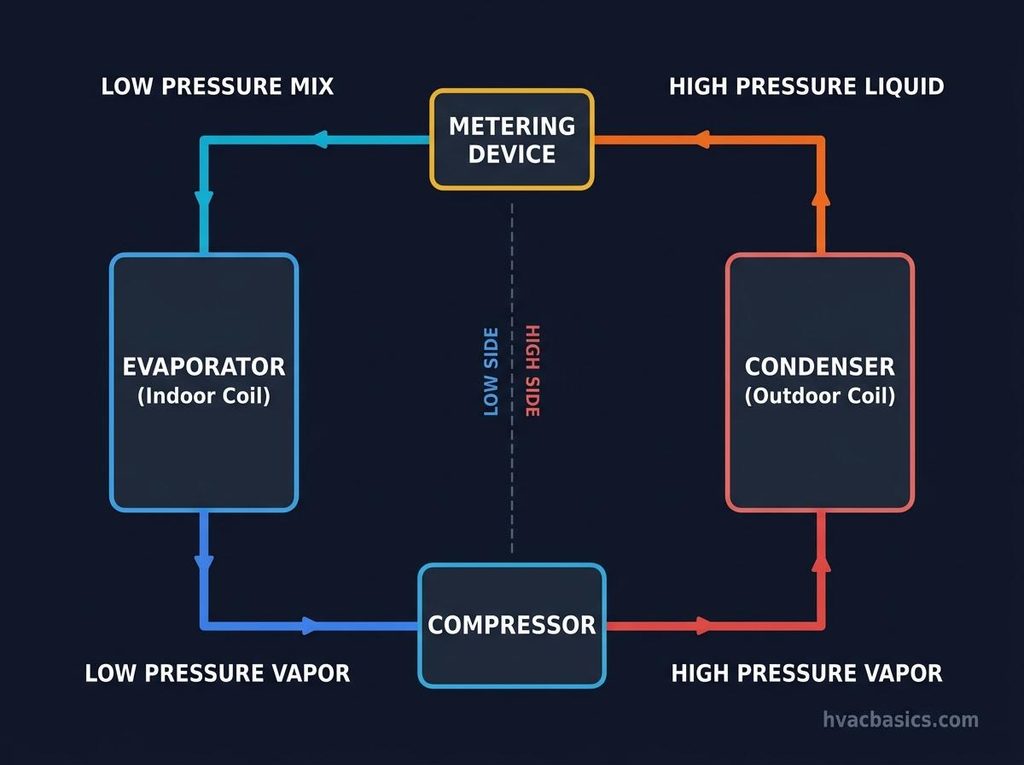
Every standard vapor compression system relies on four primary components to make this happen:
- Compressor
- Condenser
- Metering Device
- Evaporator
The Four Primary Components
1. The Compressor (The Vapor Pump)
The compressor sits between the low side and the high side of the system. Its job is simple: draw in low-pressure, low-temperature vapor from the evaporator and squeeze it into a high-pressure, high-temperature superheated vapor.
Compressors are vapor pumps. They are designed to compress gas, not liquid. Pumping liquid refrigerant or oil into the cylinders or scrolls will break valves, bend connecting rods, or blow out scrolls.
2. The Condenser (Heat Rejection)
The hot, high-pressure vapor leaves the compressor through the discharge line and enters the outdoor condenser coil. Here, outdoor air (or water in water-cooled systems) blows across the coil fins.
Because the refrigerant is hotter than the outdoor air, heat transfers out of the refrigerant into the ambient air. As it cools, three distinct stages occur in the condenser:
- De-superheating: The hot discharge gas cools down to its condensing saturation temperature.
- Condensing: The refrigerant changes state from vapor to liquid at a constant saturation temperature.
- Subcooling: Once the refrigerant is 100% liquid, it continues to cool a few degrees further below its condensing temperature before exiting through the liquid line.
3. The Metering Device (The Pressure Dropper)
The metering device (a Thermal Expansion Valve [TXV], electronic expansion valve, or fixed orifice) acts as a dividing point between the high side and the low side. It restricts the flow of liquid refrigerant feeding into the evaporator coil.
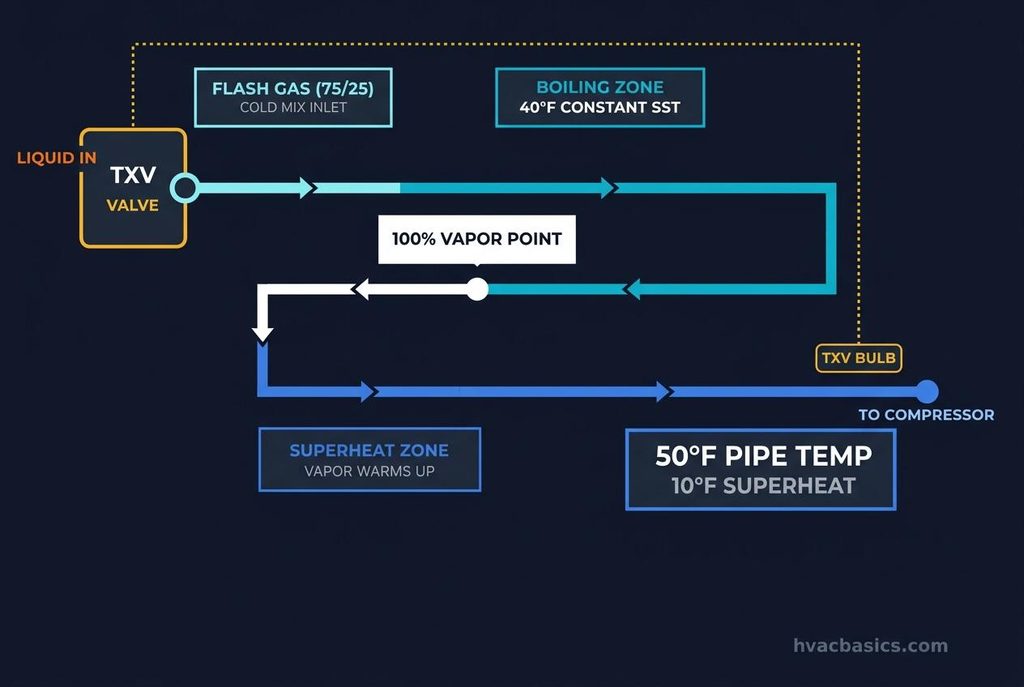
When high-pressure liquid is forced through this small opening into the low-pressure side, the pressure drops instantly. That sudden drop causes roughly 20% to 25% of the liquid to immediately vaporize. This is known as “flash gas.” The flash gas instantly chills the remaining liquid down to the evaporator saturation temperature (typically around 40°F for standard air conditioning).
4. The Evaporator (Heat Absorption)
The cold mix of liquid and vapor enters the evaporator coil located inside the conditioned space or air handler. Indoor air blows across the coil fins.
Because the room air is warmer than the 40°F coil, heat transfers from the air into the refrigerant. The liquid refrigerant absorbs this heat and boils into a vapor. By the time it reaches the end of the coil, all the liquid has boiled away into 100% vapor, and the vapor warms up slightly (superheat) before returning to the compressor.
Field Measurements: Superheat and Subcooling
Checking pressures alone does not tell you how a system is running. You need line temperatures and saturation temperatures to calculate superheat and subcooling.
Superheat (Evaporator & Compressor Protection)
Superheat is the sensible heat added to refrigerant vapor after it has completely boiled off in the evaporator coil.
Superheat = Suction Line Temperature - Saturated Suction Temperature (SST)
- Why it matters: Superheat confirms that no raw liquid refrigerant is leaving the evaporator coil to enter the compressor.
- Typical target: 8°F to 12°F on a TXV system at the evaporator outlet (or 10°F to 15°F at the compressor inlet).
- Too low (0°F to 4°F): The coil is flooding. Liquid refrigerant can wash out compressor oil and slug the compressor.
- Too high (above 20°F): The evaporator is starved of refrigerant. The system loses cooling capacity and the compressor motor runs hot due to lack of cooling vapor.
Subcooling (Condenser & Liquid Line Quality)
Subcooling is the heat removed from liquid refrigerant after it has completely condensed inside the condenser coil.
Subcooling = Saturated Condensing Temperature (SCT) - Liquid Line Temperature
- Why it matters: Subcooling guarantees that a solid, bubble-free column of liquid reaches the metering device without premature flashing in the liquid line.
- Typical target: 10°F to 12°F (always verify against the manufacturer data tag).
- Too low (below 5°F): Undercharge or flashing liquid line, causing the metering device to hunt or starve the coil.
- Too high (above 18°F): Overcharge or non-condensables backing liquid up into the condenser coil, driving head pressure up.
Practical Troubleshooting Tips from the Field
- Check airflow before touching your gauges. A dirty pleated filter, crushed return duct, or failing blower motor drops coil load. This causes low suction pressure and low superheat, often leading to coil freeze-ups. Never add refrigerant until airflow is verified.
- Feel the filter drier. A restricted liquid line filter drier acts like an unintended secondary metering device. If you measure a temperature drop across the drier (more than 1°F to 2°F), replace the drier.
- Dirty condenser coils wreck efficiency. If the outdoor coil is packed with cottonwood or dirt, heat cannot escape. Head pressure spikes, subcooling drops, and the compressor’s thermal overload will trip. Clean the coil from the inside out with water before diagnosing compressor problems.
- Always charge TXV systems by subcooling and fixed orifice systems by superheat. A TXV throttles to maintain a set superheat, meaning superheat will remain relatively constant until the system is severely starved. Use subcooling to dial in TXV charge, and use superheat charts for piston systems.
Summary Checklist
- Compressor: Moves refrigerant vapor and creates the high-low pressure differential.
- Condenser: Desuperheats, condenses vapor to liquid, and adds subcooling.
- Metering Device: Creates a sharp pressure drop, feeding flash gas and cold liquid into the coil.
- Evaporator: Absorbs heat from the indoor air, boils the liquid, and adds superheat to protect the compressor.
- Troubleshooting Rule: Verify airflow and clean coils first, then evaluate both superheat and subcooling before adjusting refrigerant charge.