
Mastering the Vitals of the Refrigeration Cycle
If you want to know what is actually happening inside a refrigeration system, you have to look past the pressures. Gauges are a great start, but they only tell half the story. To truly diagnose a system, you need to understand the relationship between temperature and pressure. Superheat and subcooling are the vital signs of any HVAC unit. Whether you are dealing with a residential split system or a commercial chiller, these two numbers will tell you if the system is healthy, starving, or drowning.
Section 1: Superheat Explained (The Low-Side Compressor Guardian)
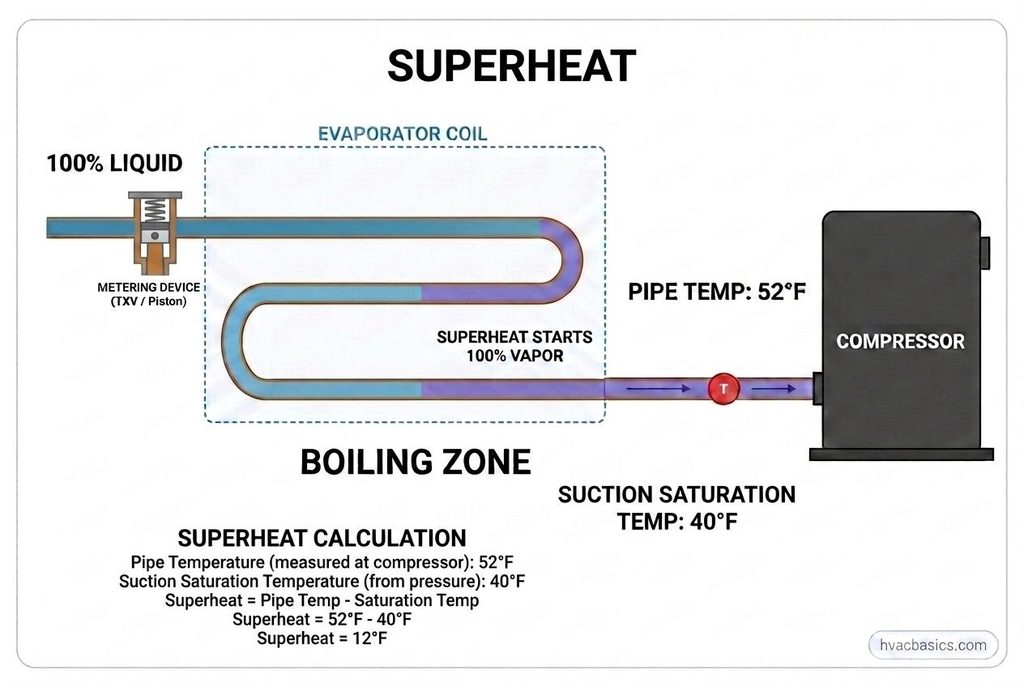
Superheat is the thermal insurance policy for your compressor. By definition, superheat is the amount of heat added to a refrigerant vapor after it has undergone a complete phase change from a liquid to a gas. In the evaporator, refrigerant absorbs heat: first as latent heat (changing phase without changing temperature) and then as sensible heat (increasing in temperature).
The Formula
Superheat = Suction Line Temperature (SLT) – Saturated Suction Temperature (SST)
Step-by-Step Measurement Procedure
- Attach your manifold gauges to the suction service valve to find the low-side pressure.
- Use a P-T chart (or your digital manifold) to convert that pressure into the Saturated Suction Temperature (SST).
- Using a calibrated pipe clamp or thermocouple, measure the actual temperature of the suction line near the service valve.
- Subtract the SST from the Suction Line Temperature.
Why It Matters: Liquid Slugging vs. Motor Overheating
Superheat ensures that only vapor enters the compressor. If superheat is too low (near 0), you risk liquid slugging, which can destroy compressor valves and bearings. If superheat is too high, the refrigerant vapor is too thin and hot to cool the compressor motor, leading to internal overheating and premature failure.
Fixed Orifice vs. TXV Targets
Targets vary based on the metering device:
- Fixed Orifice: Superheat is variable and must be calculated using a target superheat chart based on indoor wet-bulb and outdoor dry-bulb temperatures.
- TXV (Thermostatic Expansion Valve): The TXV is designed to maintain a constant superheat, typically between 8 to 12 degrees Fahrenheit.
Section 2: Subcooling Explained (The High-Side Liquid Prover)
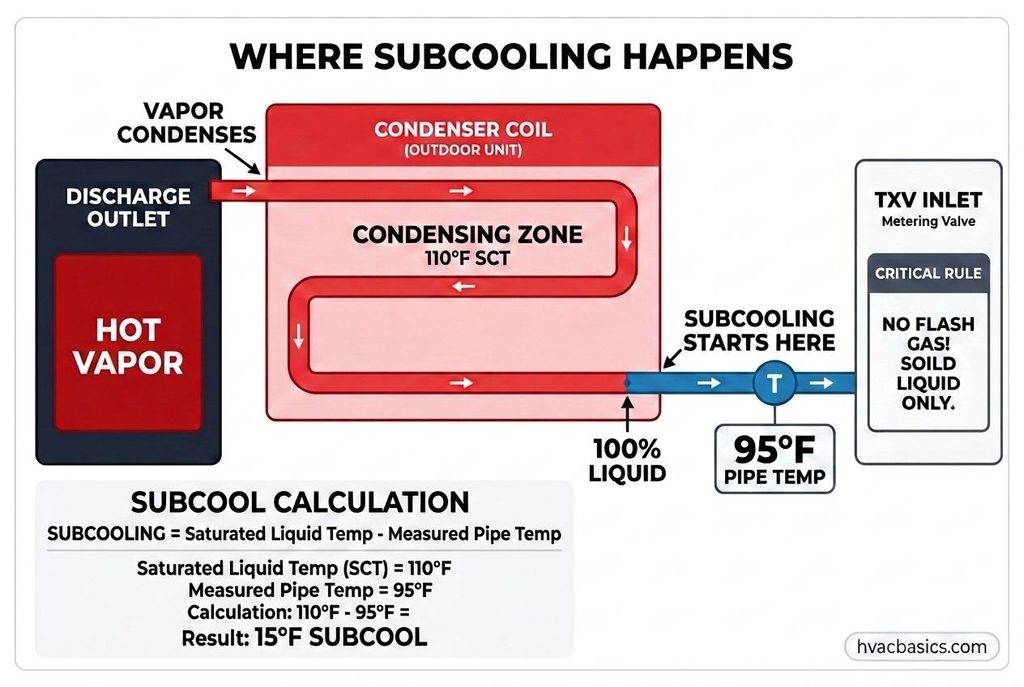
While superheat protects the compressor, subcooling ensures the metering device has a solid column of liquid to work with. Subcooling is the heat removed from a refrigerant after it has completely condensed into a liquid. It represents the sensible heat reduction below the saturation temperature.
The Formula
Subcooling = Saturated Condensing Temperature (SCT) – Liquid Line Temperature
Step-by-Step Measurement Procedure
- Attach your manifold gauges to the liquid service valve to find the high-side pressure.
- Convert that pressure into the Saturated Condensing Temperature (SCT).
- Measure the actual temperature of the liquid line using a thermocouple at the exit of the condenser.
- Subtract the Liquid Line Temperature from the SCT.
Why It Matters: Eliminating Flash Gas and Proving Total Charge
Subcooling is the primary indicator of the refrigerant charge level in a TXV-controlled system. High subcooling ensures that the refrigerant does not “flash” back into a gas before reaching the TXV. Without a solid liquid column, the metering device cannot feed the evaporator efficiently.
Rating Plate Targets
Always refer to the manufacturer rating plate on the outdoor unit for the required subcooling. Most modern high-efficiency systems call for a subcooling target between 8 to 15 degrees Fahrenheit.
Section 3: The 4-Quadrant Diagnostic Matrix (Reading the Numbers as a Pair)
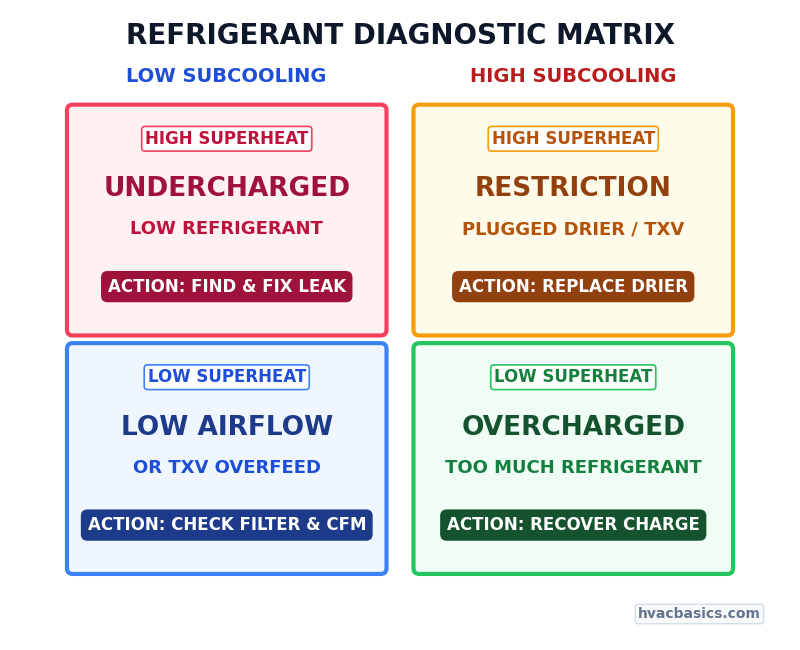
Diagnosing a system with only one measurement is like trying to find a coordinate with only one axis. You must look at superheat and subcooling together to see the full picture.
1. High Superheat + Low Subcooling (Undercharge)
The system is starving. There is not enough refrigerant to fill the condenser (low subcooling) and the evaporator is running out of liquid halfway through, leading to high sensible heat gain (high superheat).
2. Low Superheat + High Subcooling (Overcharge)
The system is backed up. The condenser is overfilled with liquid (high subcooling), and the evaporator is being flooded, sending liquid or very cold vapor back toward the compressor (low superheat).
3. High Superheat + High Subcooling (Liquid Line Restriction / TXV Restricted)
Refrigerant is getting “stacked” in the condenser because it cannot get through a restriction (like a clogged filter drier or a closed TXV). This leads to high subcooling in the condenser and a starving evaporator with high superheat.
4. Low Superheat + Low Subcooling (TXV Overfeeding / Low Airflow Load)
The refrigerant is moving too fast or there is not enough heat to boil it off. This usually indicates a TXV that is stuck open or an evaporator that is not absorbing heat due to severely low airflow or a dirty coil.
Diagnostic Summary Table
| Scenario | Superheat | Subcooling | Likely Fault |
|---|---|---|---|
| Undercharge | High | Low | Low refrigerant levels |
| Overcharge | Low | High | Excess refrigerant levels |
| Restriction | High | High | Clogged drier or restricted TXV |
| Overfeeding/Low Load | Low | Low | TXV stuck open or low airflow |
Section 4: Practical Field Rules Before You Touch Your Gauges
Before you start adding or recovering refrigerant based on these numbers, you must ensure the system is ready for testing.
- Airflow and static pressure first: Never trust your refrigeration numbers if you have a dirty filter, a slipping belt, or a fouled evaporator coil. Airflow issues can mimic refrigeration problems.
- Insulating temperature probes: Ensure your thermocouples are making good contact with the copper and are insulated from the surrounding ambient air to get an accurate line temperature.
- Allowing steady-state runtime: A system needs to run for at least 10 to 15 minutes before pressures and temperatures stabilize enough for a valid reading.
- Matching the charging method: Remember to charge by subcooling for TXV systems and by superheat for fixed orifice systems.
Summary and Key Takeaways
- Superheat protects the compressor from liquid slugging and ensures proper motor cooling.
- Subcooling ensures a solid column of liquid reaches the metering device.
- Always check airflow and static pressure before making charge adjustments.
- Use the 4-quadrant matrix to differentiate between an undercharge and a restriction.
- Target subcooling is found on the rating plate; target superheat for fixed orifices is found on a charging chart.